Pages

Showing posts with label DIY. Show all posts

Saturday, August 1, 2015

Wishlist! Projects & More Projects!


This is an updated list, since I have a few projects that I'd like to attempt in the not-too-distant future.  In doing so, there are a few things I need to save up in order to complete the projects.  If you are able to help me collect any of the items below that would be great!  Here is a short list of things I'm looking for.  I figured it doesn't hurt to ask since a lot of it is stuff you might be throwing out.  I'll keep this list fluid and add/delete as needed.  Thank you, in advance, for any help you might be.

  • vinyl tablecloths.  both flannel-backed and non-flanned-backed are fine. 
  • flat-bottomed glass gems/gems/stones
  • clay pots and drain trays (can also be plastic)
  • rocks, river stones (Smooth is what I'm going for.)
  • old, used metal bowls of various sizes
  • golf balls
  • hubcaps
  • empty soda bottles, water bottles, Gatorade bottles, Powerade bottles, etc.  I'm looking for sizes 16oz-24oz.; I will take the caps, too, if have them.
  • clothespins
  • ribbon scraps of any kind
  • fabric scraps.  Do you have small, random pieces of various fabrics you want to get rid of?  (any size, pattern, texture) I can use them.  
  • Wooden blocks, Jenga games.  Any sizes, shapes, colors.
  • EMPTY child-proof prescription bottles, empty film canisters, plastic Easter eggs THANK YOU, I have collected what I need with these items for now.


Tuesday, February 24, 2015

A Spicy Mess No More!

Ok. So, yes, I'm super behind on blogging anything lately.  I have had many thoughts of "oh, I should type up something about that and post it to my blog" but alas, time gets away from me with two little ones these days.  This post is super short, so I had time to post it up quickly.

I was doing some morning reading online and when I was finished I jumped on Pinterest to look for a valentine's craft to occupy my little guy this morning.  (Don't judge the amount of pins and likes I have; I often jump on Pinterest when nursing.) Back to the topic at hand--the shelf I keep all of our kitchen spices is a total disaster. I can never find what I need quickly.  This pin spoke directly to me.  I don't know how I didn't come up with something like this sooner, since I actually do have something similar for boxed pasta and rice in my pantry, but for whatever reason it never occured to me to organize my lesser-used spices! I read this and BAM!  I now have a system for the spices I rarely use.

I took the idea one step further and typed up a quick list of what spices are actually in the basket.  This is helpful when I need something that I think I have, but in reality I probably just thought about buying it at some point.  We also have the amazing, wonderful Dekalb International Farmers Market not too far from our house where I buy some of my spices in bulk.  These containers stack great, but I have to take them all out to get what I'm looking for.  These are also on the list I created.

Here's to trying to organize my life one small step at a time! (My BIG job of cleaning and organizing our Florida room starts this weekend!  Say a prayer for me.)


Saturday, February 8, 2014

handprint

I'm simply posting this to share a project we'll be making with some friends of mine.


Tuesday, October 1, 2013

Community Group Banner

This is a quick project I put together for the first night of our Community Group tonight.  I have seen these burlap banners all over the place, and I've always wanted to make a personalized one, but I never knew what to make.  I saw how easy this is to do while at a Pinterest party earlier this year and a lady was painting/stamping lettering on her own project.

All I did was get a yard of burlap (super cheap!), a pack of $3 letter stencils at Walmart, paint, and paintbrushes.  I used some twine and hot glue to assemble.  You will also want something like scrap paper or newspaper to put under the burlap when you're painting, since the paint will go through to the surface underneath.  I forgot about that until I was about 3 triangles into the painting process.

Our church's name is Anchor church and this year our small group ministry has changed names from Home Groups to Community Groups.  With these two bits of information in mind, I wanted to incorporate both ideas into the banner.  I toyed with many different wording ideas, but they were all way too long.  My banner would go across the whole house if I used any of them.  Then, this idea struck me...so here's what we had for our first meeting tonight...


I absolutely love how it came out!  Seeing how easy it was to make, I see myself doing this again for other events, holidays, rainy days, you name it!  This is such an easy project to make and personalize to suit your needs.


Monday, September 30, 2013

Rainbow Craft


This fall I've been doing a homeschool/preschool group with some moms in my area.  It's been a ton of fun and we've made some new friends, too.  Two of this week's themes are rainbows and the number 6.  For those who were unable to attend, here is my project in case you want to do it at home.


This is how I did it.  Of course, you can do it however you want!
Materials:
paper plate (I used yellow from the Dollar Tree.)
paper streamers (red, orange, yellow, green, blue, purple)
glue bottle (not glue stick)
Raindrops w/dots (I printed on blue paper.)
number 6
Scissors
Ribbon or string if you want to hang it when finished

1. Cut paper plate in half.  If you don't want to cut the plate, that's fine, too.
2.  Glue the streamers (6 rainbow colors) along the bottom of the plate.  They have to be close together or else they won't all fit.
3.  Cut out and glue the raindrops to the plate where the streamers meet the plate.  I created numbers 1-6 so your child can practice counting.
6.  Glue the colorful polka dot 6 to the front or back of the plate.  I stuck it on the back since I'm going to hang mine rather than put it on a wall/refrigerator.
7.  Punch hole and tie string/ribbon if you're going to hang it.


Here are the parts.  You can print them right from here, but it will work best if you right click, save the file, then open and print that way.


Thursday, August 8, 2013

Roll It Up Pillowcase


"Roll It Up" Pillowcase

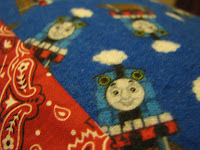
I was super excited to try my latest sewing project.  After pinning several different sewing projects on Pinterest, I decided I really wanted to try making a pillowcase.  I started out thinking I'd make a travel size pillow for the little guy, but I went ahead and did a regular size pillowcase.  Sam adored a Thomas the Train flannel fabric when we were shopping at the fabric store, so I purchased it and got started a few days later.  It came out so much better than I was expecting, even with its imperfections that I know are there.  What I loved most about the tutorial I used is that it has a great video to go with it!  The video doesn't take you through the entire project, but it shows enough to get you about 3/4 of the way through.  I took a few pictures along the way, but the video and pdf tutorials are much better at telling you how to make the pillowcase. One of my favorite things about this actual pillowcase is that there are no exposed edges, which gives it a nice, finished look.

Materials:
12" x 42" fabric for band of pillowcase
24" x "42" fabric for pillowcase body
iron
sewing machine
I will admit that my measurements weren't exact this first time around and one of my fabrics only measured about 41".  Because of that, I just trimmed both to match the 41"...it was no problem at all!

1.  Place your band fabric right side up on your work space.  Place pillowcase body fabric right side down, matching up your long sides at the top.


Once you have it lined up, it should look like this:

2.  Now you're going to do the roll-up part of the project.  Starting at the bottom of the fabric, roll up the body piece of fabric until you see about half of your band fabric.

3. Leave your "roll" sit there.  Now bring the bottom of the band fabric up to the upper/top raw edge.
  

4.  Pin the entire top edge in place.  You should have three pieces of fabric that you are pinning together to make a little pocket/tube with your fabric.  Be sure you do not pin the rolled up portion.  It should remain a roll inside of your new tube of fabric.


5.  Sew your pinned edges together with a 1/2" seam allowance, again making sure not to sew your inner "roll."
  

6.  Invert your fabric by pulling your "body" fabric out from the tube.  You'll be turning the pillowcase band right side out making the pillowcase body.  Unroll the entire pillowcase.  All seam allowances should be encased within the pillowcase band.  So pretty!
  

7.  With your iron, press the band with seam allowances going toward the band.  You may have to pull it a little bit to make sure it's pretty flat and taught.  Turn over and repeat, pressing the back side.

8.  To finish the pillowcase, finish it with French seams.  In doing it this way, all of your edges will be finished and won't be exposed at all.  It gives this pillowcase a really nice, clean look when you're all done.  Use the pdf tutorial if you need help learning the French stitch.  That is what I used to learn, and it worked out perfectly!


We have one happy customer!


Go here for the video tutorial.
You can download the pdf of this entire tutorial just below the video at the same link.


Thursday, August 1, 2013

Cake Up-sizer...who knew?

Today I discovered something new.  Did you know that boxed cake mixes have gotten smaller in recent years?
Really?!?!
Yes!
I had no idea.
I KNOW!

Here are two instances where it might actually cause a problem:
1.  Making a recipe that calls for a boxed cake mix
2.  You need 24 cupcakes and can barely get 22 out of the mix!

I came across this little discovery while browsing Pinterest for a sewing pattern.  (Yes, yes, my mind wanders from one thing to another while in Pinterest--just like yours does.)   This lady had an ingenious idea to come up with a mixture to make up for the missing 3 ounces of cake mix.  Go to her blog to get the recipe for the mixture.  You'll thank me later.

Go here to Make A Jar of Cake "Up-Sizer"

Click photo to get the recipe!


Monday, April 22, 2013


I | fonts—all sorts & kinds.  If you’re like me, there has to be the perfect font for every project.  I stumbled upon this blog with a link to free fonts.  Click on the image and it'll take you to the free downloads.  Enjoy! 

If you repost, use the photo only and create a link back to the original blog.  Thanks!


Tuesday, April 16, 2013

Busy Bags-Button Snake

I've decided to keep the idea of Busy Bags in mind.  Someday when my house is organized, all my laundry is washed and put away, my books are all on bookshelves...then, I might organize a Busy Bag Swap.  Until then, I'll putter with different ideas now and then.  

The first item I decided to make is a Button Snake.  It was simple, which is exactly what I was looking for.


All you need: ribbon, large button, felt, needle, thread, scissors


I got the buttons for $1.97 at Walmart in the sewing section.

Sew a button to one end of the ribbon.

Cut a slit in a piece of square felt.
Sew it to the end of ribbon opposite the newly sewn button.  You can see I thread the ribbon slightly through the slit and sewed it down.


Cut square pieces of felt.  This doesn't have to be exact.
I didn't measure, but I'd guess my squares are about 2in. x 2in.  Cut a slit in each square that's big enough for your button to fit through.
The slit can be tight as it will loosen upon using.
It's easy to make a slit by folding your square in half and making a small cut, just like you would making paper snowflakes.

Voila!  There you have it.
The entire thing took less than ten minutes.


My 18 month old son LOVES it!  He doesn't quite have the hang of it yet, but he's very close.  He liked seeing the button peeking through the felt slit.  He also likes to thread all the squares on the ribbon and just slide them back and forth from one end to the other.  This will be useful at restaurants, the grocery store shopping cart, church, car rides, etc.


Thursday, April 11, 2013

My New Project--shelves!

If you know me, you know I like a good DIY project.  However, I don't know a whole lot about things that don't fall under the "general crafts" type of title.  The other day I was browsing a particular eBay auction listing, which I do with some regularity, and saw this set of bookshelves.  I really thought I could do something great with them.  I waited until a few minutes left in the auction and got ready to hit my keyboard's "enter" key fast.  Low and behold, I won the shelves!  Woohoo!  I went to pick them up today, and they are in better condition than I thought.  They're also a little bigger (yay!) than I thought.  

I plan to sand and re-stain then, but I haven't a clue how to do either of these two things.  I'll have to do a little research before I begin, but a few people (mostly family who live far away) wanted to see what I bought, or should I say...wanted to see what I've gotten myself into.  So, here are a few pictures to give you a look at the "before" of the bookshelves.  I can't wait to work on the project and actually finish it!


These are the two shelves just as I received them.

 
I like the rounded edges!

 
These photos show some of the smaller things I want to clean up and fix up.

 
These two photos are just to show how tall they are.


This final photo is where I'm thinking of placing one of the shelves.  The frames on the wall are come down to be replaced with a shelf-style gallery wall.  (See below for what I'm looking to do with this "photo wall" soon.)  The other option in this room is putting them next to each other, stretching almost the whole length of the wall opposite the wall in this photo.  Not sure what we'll do yet.


Ideas I'm looking at for inspiration where the photo wall will be in our dining room.  I'd have the gallery wall above and the bookshelf below.
Photo Credit
Photo Credit
Photo Credit.  Red wall, white shelf   

Photo Credit.  Red wall, red shelf

Photo Credit.  Crown molding shelves